Let’s say we have a domain name, ourcooldoma.in. And for some reason we want to redirect all traffic to somecool.org. And the following things also apply:
ourcooldoma.in is registered at a hoster like Namecheap.
somecool.org does not belong ot us at all.
we want to redirect ourcooldoma.in and www.ourcooldoma.in.
we are already using AWS.
(Told you it was specific..)
Then we can do this:
Set up an empty S3 bucket at AWS and make it public.
In the properties of the bucket use the Static Website Hosting feature in Properties and define a redirect to somecool.org. Take note of the Endpoint value in the Static Website Hosting box.
Because we support HTTPS use ACM to create a certificate that matches ourcooldoma.in and www.ourcooldoma.in (or *.ourcooldoma.in).
Create a Cloudfront distribution that uses that bucket’s Endpoint as origin and is valid for the domains www.ourcooldoma.in and ourcooldoma.in. Use the certificate from the step before.
Configure ALIAS records at Namecheap for www and @ pointing to the domain name of our Cloudfront distribution.
Done!
Now every request to ourcooldoma.in will result in a DNS query that returns the ALIAS entry (though I believe ALIAS is not a standard key but a technicality provided by Namecheap and others to circumvent the restriction of CNAME, which one would normally use, but which cannot be used with @ unless you are ok with masking your MX and other subdomain records).
So our request will be actually fired against the IP address at Cloudfront but the client still expects a valid SSL certificate for ourcooldoma.in. Cloudfront provides that (created in step 3) and we can finally get to the (cached) bucket, which only does one thing: 301 redirect the client to somecool.org.
Sometimes we have a closed source binary library that we want to include in our iOS project. To do that Xcode needs to do the following things:
Find the framework (via defaults or the Framework Search Paths setting).
Embed the framework in the bundle and sign it.
Link against the framework during build.
Strip any architectures from the framework binary that are not required (or even forbidden: You cannot for instance ship a binary that contains code for x86_64 through AppStoreConnect).
I want to add another complication, which is of course optional: The framework is only included for some configurations, for example DebugWithFramework. It should not be included in all other configs.
First I will show how to do it manually and then I will show the Cocoapods way, which, in my humble developer opinion, is superior.
Approach 1: The manual approach
So let’s say we want to do the above steps manually.
For the optional “only some configurations” requirement make sure the configurations have been created.
Step 1: Add the Framework
We can just pull the binary framework into our file tree in Xcode and we’re done. However, if we only want to include it in some configurations we should uncheck the target membership of the framework and add it manually.
Step 2: Framework Search Paths & Linker Setting
We need to tell our build system about our Framework. I believe this is already done for us if we add the Framework to our target and/or if we drag the Framework into the “Embedded Frameworks” box in settings.
But this part of the post is about the manual approach, with inclusion for only certain configurations, so we need to do two things: Set the Framework Search Path and tell the Linker.
But this is easy:
In Build Settings look for Other Linker Flags and add two lines for the configurations that matter (you may need to click the drop down arrow first): “-framework” and “CoolFramework” if “CoolFramework” is the name of your framework, otherwise please substitute the correct value.
Finally in Build Settings look for Framework Search Paths. Again select the configurations that you care about and add a new line below $(inherited) that looks something like this:
$(PROJECT_DIR)/Frameworks/MyCoolFramework/debug
And you should be good to go.
At this point your app probably compiles but at runtime it crashes complaining that it can’t find the Framework.
That’s because it’s not in the Bundle yet. For that you need the next step:
Step 3: Embed & Sign
If it’s supposed to be included for all configs we can just add it by dragging it into the Embedded Frameworks box in our project settings (assuming it’s not already there). Then make sure the option is set to “Embed & Sign” and you’re done.
It gets slightly more complicated if we include it manually. For that we can add a custom script build phase in our Build Phases tab that looks somewhat like this:
if [[ -z ${SCRIPT_INPUT_FILE_0} || -z ${SCRIPT_OUTPUT_FILE_0} ]]; then
    echo "This Xcode Run Script build phase must be configured with Input & Output Files"
    exit 1
fi

echo "Embed ${SCRIPT_INPUT_FILE_0}"
if [[ $CONFIGURATION == 'DebugWithFramework' || $CONFIGURATION == 'ReleaseWithFramework' ]]; then
      FRAMEWORK_SOURCE=${SCRIPT_INPUT_FILE_0}
        FRAMEWORK_DESTINATION=${SCRIPT_OUTPUT_FILE_0}
        DESTINATION_FOLDER=`dirname ${FRAMEWORK_DESTINATION}`

        mkdir -p ${DESTINATION_FOLDER}
        cp -Rv ${FRAMEWORK_SOURCE} ${FRAMEWORK_DESTINATION}

        CODE_SIGN_IDENTITY_FOR_ITEMS="${EXPANDED_CODE_SIGN_IDENTITY_NAME}"
        if [ "${CODE_SIGN_IDENTITY_FOR_ITEMS}" = "" ] ; then
            CODE_SIGN_IDENTITY_FOR_ITEMS="${CODE_SIGN_IDENTITY}"
        fi

        BINARY_NAME=`basename ${FRAMEWORK_DESTINATION} .framework`
        codesign --force --verbose --sign "${CODE_SIGN_IDENTITY_FOR_ITEMS}" ${FRAMEWORK_DESTINATION}/${BINARY_NAME}
        echo " ✅ Embedded successfully"
    else
        echo " ❌ Non MyCoolFramework build detected - do not embed"
    fi
Script phases have input and output files (extra input text fields), and in our case we can set it to the following values:
So the output specifies where the binary goes in the compiled bundle.
Disclaimer: This code is a slightly modified snippet from Github. If I find it, I’ll link to it later.
Step 4: Strip Unnecessary Architectures
The app may run fine now in your Simulator or even on an actual iPhone or iPad, but if we want to submit our app to the AppStore we need to do one more thing: Remove architectures that are not used by the target devices.
Quick sidenote: What are architectures?
Well if you write source code it eventually gets compiled into machine code. Zeroes and Ones that are actually instructions (opcodes + arguments) for the CPU. But CPUs are different, they have different architectures and each architecture has different opcodes. (Simply speaking.) Until Apple switches to Apple Silicon, your mac (and your iOS Simulator) most likely has a x86_64 Intel CPU. And your iPhone most likely has a armv7 CPU.
If you have a binary framework that you did not compile yourself it must have the binary code for correct architectures already included. And the best case is that it has the code for _all_required architectures.
So what do we do before uploading to the AppStore?
We get rid off all binary code that is not for iPhone and iPad.
And we do it using a command line tool called lipo.
Now remember, Xcode does all this for you automatically, usually, but we are handling a custom case here where our framwork is binary.
Here’s the build script phase for that:
if [[ $CONFIGURATION == 'DebugWithFramework' || $CONFIGURATION == 'ReleaseWithFramework' ]]; then

  FRAMEWORK="MyCoolFramework"
  FRAMEWORK_EXECUTABLE_PATH="${BUILT_PRODUCTS_DIR}/${FRAMEWORKS_FOLDER_PATH}/$FRAMEWORK.framework/$FRAMEWORK"
  EXTRACTED_ARCHS=()

  for ARCH in $ARCHS
  do
    lipo -extract "$ARCH" "$FRAMEWORK_EXECUTABLE_PATH" -o "$FRAMEWORK_EXECUTABLE_PATH-$ARCH"
    EXTRACTED_ARCHS+=("$FRAMEWORK_EXECUTABLE_PATH-$ARCH")
  done

  lipo -o "$FRAMEWORK_EXECUTABLE_PATH-merged" -create "${EXTRACTED_ARCHS[@]}"

  rm "${EXTRACTED_ARCHS[@]}"
  rm "$FRAMEWORK_EXECUTABLE_PATH"
  mv "$FRAMEWORK_EXECUTABLE_PATH-merged" "$FRAMEWORK_EXECUTABLE_PATH"
fi
This can be changed a bit to work for all frameworks I guess, but here it’s the special case in which we have one framework, MyCoolFramework, and two configurations DebugWithFramework and ReleaseWithFramework.
Step 5: Using the Framework in our code
Just briefly I want to mention how you can prevent compilation errors by using an #if clause in your code. Consider this Swift code:
You can use these if-blocks liberally everywhere in your Swift code.
Conclusion & Open Questions
I think we’re done. (If not please write a comment so I can fix it. I don’t have a lot of time to double check everything I’ve written here. Thanks.)
As you can see the manual approach is tiresome but at least we learn somehting about how Xcode builds apps for us!
I want to mention one more complication that can and probably will occur: What if our Framework has dependencies, for example Cocapods that must be present? They can be added in the Podfile but if we need to restrict the inclusion to certain configurations then we must take extra steps.
That’s why we should use Cocoapods all the way in the first place! ;)
Ok let’s look at how that’s done in the second part.
Approach 2: Using Cocapods
Now we will make our own Cocoapod that simply includes our vendor framework. Now why do we want to do that? Because Cocoapods takes care of all the steps above for us!
That’s right, the batteries are included. Let’s start.
Btw. I assume you are already using Cocoapods and your project already has a Podfile. (If not, please add Cocoapods now and run pod init in your project folder.)
Step 1: Writing a gemspec file
A pod is defined by a gemspec file that instructs the pod binary what to do when installing. I’ll keep it brief and just paste you own for our case. But there are more options which may be required. Especially if you are also having swift and objective c files in there somewhere that must be compiled. Our case is actually simpler because the framework is binary.
We’re writing a local pod by the way. You could have it remotely in some git repo and you could even publish it in the cococapods repository but our case here it’s local only and it’s in the same git repository as our app. It’s basically just in a subfolder.
The gemspec should be in the same folder as they framework and the framework folder should be zipped. Cocoapods will unzip the archive during installation.
There’s also a speciality here: Our framework has dependencies, it requires the RxSwift pod to run. I’ve added this to show you to demonstrate that it’s easy to add dependencies now and also to show a peculiarity about Cocoapods below.
Step 2: Adding our brand new pod
Let’s see how our Podfile looks now:
target 'App' do
  pod "MyCoolFramework", :podspec => "Frameworks/MyCoolFramework/debug/", :configurations => ["DebugWithFramework, "ReleaseWithFramework"]

  pod "RxCocoa", "5.1.0", :configurations => ["DebugWithFramework, "ReleaseWithFramework"]
  pod "RxDataSources", "4.0.1", :configurations => ["DebugWithFramework, "ReleaseWithFramework"]
  pod "RxSwift", "5.1.0", :configurations => ["DebugWithFramework, "ReleaseWithFramework"]
  # explicit dependency for RxCocoa:
  pod 'RxRelay', '~> 5.0', :configurations => ["DebugWithFramework, "ReleaseWithFramework"]
end
And if we don’t care about configurations it’s just this:
target 'App' do
  pod "MyCoolFramework", :podspec => "Frameworks/MyCoolFramework/debug/"
end
Now we can run pod install and we’re good to go! We can run the app and even submit it to the AppStore, because Cocoapods takes care of all the steps from the manual approach for us!
There’s one thing that you should look out for regarding the configurations. As you see in the Podfile examples, it gets much more verbose when we want to restrict the pod to be included in certain configurations only. That is because Cocoapods requires us to also specify all the dependencies and the dependencies’ dependencies (transitive dependencies) explicitely IF we want to restrict them to some configurations.
Consider this:
target 'App' do
  pod "MyCoolFramework", :podspec => "Frameworks/MyCoolFramework/debug/", :configurations => ["DebugWithFramework, "ReleaseWithFramework"]
end
Here our framework is not included in the “Debug” stage, however it’s dependencies are. This is something to look out for.
Protip: Build and afterwards look inside your compiled app’s package. There’s a frameworks folder there. You should only see pods that are dependencies of our framework in apps build with those configurations.
Final words
That’s it, I hope this helps someone. Please send me any corrections or comment below. Thank you!
I’m a big fan of the Mazda MX-5, which is also called Mazda Miata. I had one a few years ago and I still miss it. I think this is the perfect car. Unless you need a third seat or luggage space..
Speaking of luggage. What fascinates me is that virtually everyone installs the luggage rack the wrong way!
The only exception is the third gen Miata where it’s usually done right, and despite the fact that we all see the 3rd gen on the road most of us still don’t get it.
Here is what I mean:
The rack on this beautfiul 2nd gen should be rotated by 180 degrees. The short sticking out part should be towards the front, not back.
Why?
Because its function is to prevent your luggage from chopping your head off if you crash into something. It’s not there to prevent your luggage from falling down because of the crazy acceleration of the Miata.
Because, let’s face it, the Miata doesn’t accelerate that quickly.
3rd gen (“NC”) owners get it usually right, because the luggage racks are shipped with a brake light, since the rack obscures the 3rd brake lamp. So there’s just one way to install it, the correct way, the way that prevents your bags from killing you.
Or not just you. Everyone else that is unlucky enough to be crashed into by a Miata!
Just saying.
(Fanboy disclaimer: Luckily, this is a mostly theoretical discussion. The Miata handles awesomly. It’s rare that you would loose control and crash.)
But still.. I wonder, what else in life is obviously wrong, that we, the average people who never thought too much about it, don’t get?
Es folgt eine kurze Anleitung, wie wir die Steuern unserer 2-Mann GbR erklärt haben. Die GbR hat auf der Einnahmenseite Apple (App Store Verkäufe und Abos) und Google (AdMob Werbung) und auf der Ausgabenseite Dinge wie Serverkosten, Übersetzungen, Kauf von Grafiken usw. Die Einnahmen werden 50:50 zwischen den beiden Gesellschaftler aufgeteilt. Es gilt die Kleinunternehmerregelung.
Die Steuererklärung wurde auf elster.de erstellt und verschickt.
Wichtiger Hinweis: Dieser Blogpost ist keine Beratung eines qualifizierten Menschen, z.B. eines Steuerberaters, sondern nur der anekdotenhafte Post eines Laien ohne Anspruch auf Korrektheit. Im Zweifel bitte auf jeden Fall also Gehirn benutzen und einen Profi fragen!
Die Arbeit gliederte sich in 2 Phasen:
Aufstellung aller Einnahmen und Ausgaben anfertigen. (Rechnungen, Belege und Kontoauszüge checken und beiseite legen.)
Elster-Formulare ausfüllen.
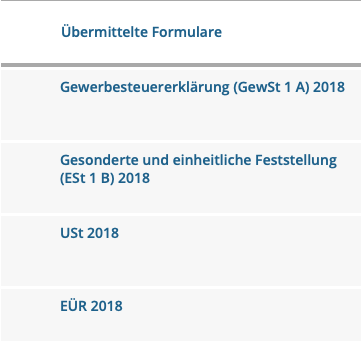
Auf dem Screenshot sieht man die 4 Formulare, die wir übermittelt haben. Ich beschreibe sie nacheinander von oben nach unten.
Formular 1: Die Gewerbesteuererklärung
Im Screenshot sieht man, was wir ausgefüllt haben (alles andere wurde entsprechend nicht ausgefüllt). Das grüne Feld: Hier Gewinn Eintragen. Gewinn = Einnahmen - Ausgaben.
Formular 2: Gesonderte und einheitliche Festellung
Hier haben wir 2 mal (weil wir 2 Gesellschafter sind) die Anlage FB hinzugefügt. Siehe Screenshots. Blauer und grüner Kasten: Infos der Gesellschaftler eintragen. In letzten Bild sieht man auch bei “Zähler” und “Nenner”, dass wir 50:50 geteilt haben.
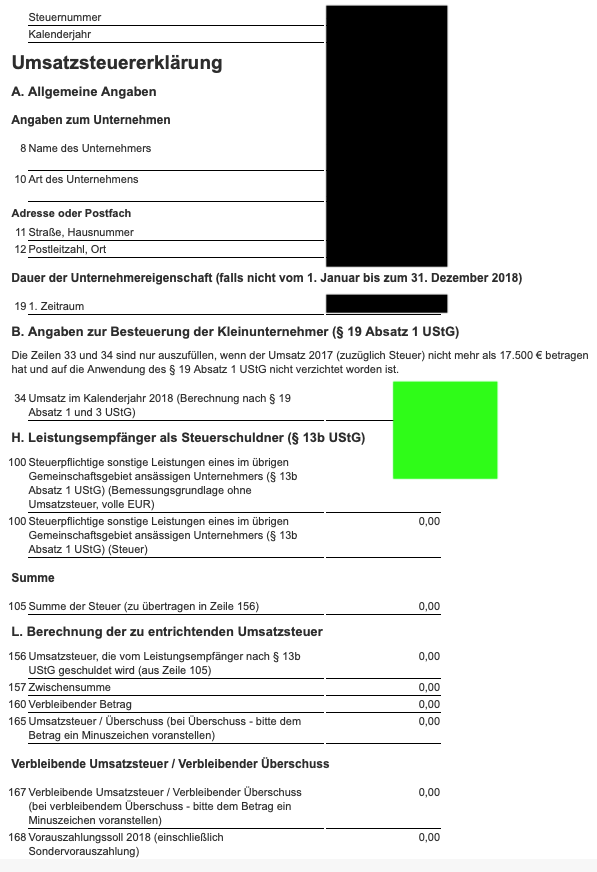
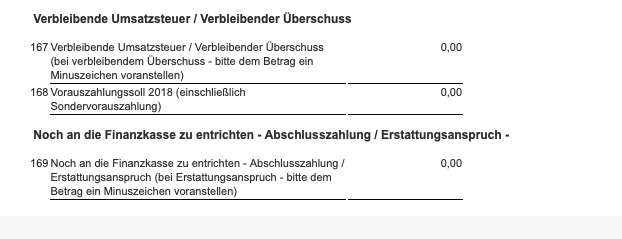
Formular 3: Umsatzsteuererklärung
Hier haben wir im Grunde nur eine 0 erklärt. Die Beträge, die angefallen sind, unterliegen nämlich sämtlich §13b UstG (Stichwort “Reverse Charge Verfahren” bzw. “Steuerschuldumkehr”). Dies ist nicht immer der Fall! Bei uns aber schon, da unsere Einnahmen alle von Google und Apple stammen und diese Firmen es (in unserem Zusammenhang jedenfalls) so machen.
Das Grüne Feld: Hier Umsatz Eintragen. (Also Gewinn + Ausgaben.)
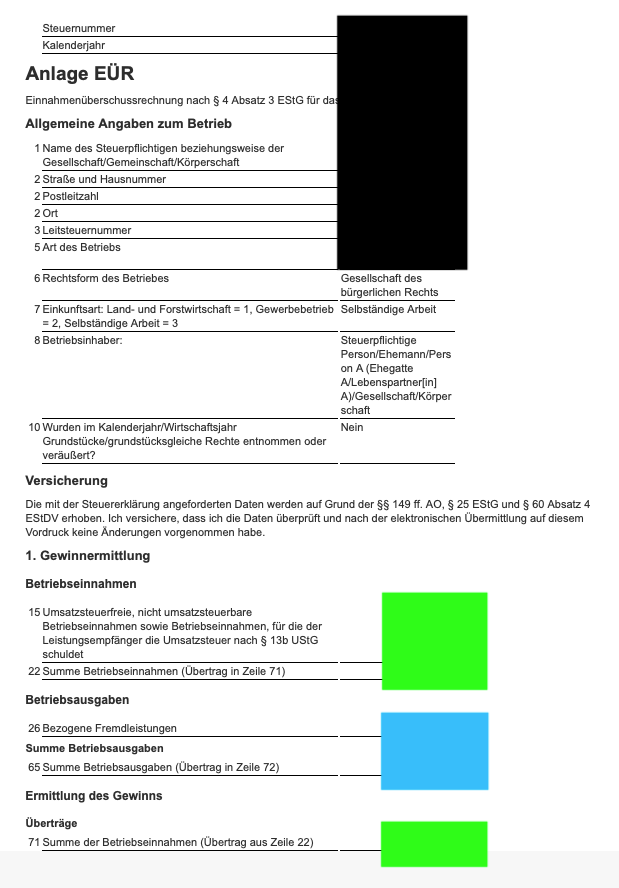
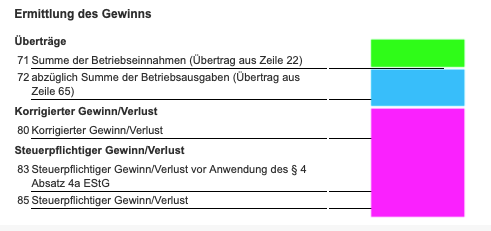
Formular 4: Die EÜR
Last but not least die Einnahmenüberschussrechnung.
Das grüne Feld: Hier Umsatz Eintragen. (Also Gewinn + Ausgaben.)
Das blaue Feld: Hier Ausgaben Eintragen. (Also Umsatz - Gewinn.)
Das rosa Feld: Hier Gewinn Eintragen. (Also Umsatz - Ausgaben.)
Schlusswort
So, das wars. So viel ist das also gar nicht. Ich hoffe, ich konnte jemandem helfen, aber ich weise nochmal drauf hin, dass es hier erstens um einen Spezialfall geht: 2 Personen GbR, App Business, Einnahmen von Google und Apple. Und Zweitens übernehme ich ausdrücklich keine Haftung für Eure Taten, sprich Steuererklärungen. Ich bin Laie und berichte nur, wie wir das ausgefüllt haben.
I wrote a small tool that allows to compare different scenarios when borrowing money for buying real-estate.
There are a few parameters that can be set:
How much money do I need?
How much do I want to pay back every month?
For how long is the interest rate fixed? (Longer fixing = higher rate)
Am I planning to use unscheduled repayments? (Those are mandatory, but of course lower the cost of borrowing and shorten the time until you’re debt-free.)
The tool allows to compare different selections on three of those parameters (the loan sum is currently fixed).
If you have collection or table view that can change in unpredictable ways, and you wish to animate the changes, then you will usually use the performBatchUpdates method of UICollectionView and UITableView.
This method takes a block, and in that block you are expected to account for all the changes in your datasource. For instance, if the number of elements returned in a section is 20 and after the performBatchUpdates-call its 10, they you are required to either delete 10 rows or items within that block, or delete 11 and add 1, or delete 20 and add 10, and so forth. The numbers must add up, otherwise your app will crash with an NSInternatlInconsistencyException. (You can theoretically catch it but I haven’t tried because I suspect it will lead to many odd bugs if you do.)
Ok, so I googled for a generic way to calculate the necessary accounting, and I found this answer on StackOverflow.
The StackOverflow soltuon is presented in pseudocode, so here’s how it would look like with Swift.
import Foundation

enum ArrayAction {
    case added(Int)
    case deleted(Int)
    case moved(Int, Int)

    static func operationsPerformed(arrayBefore before: [Int], arrayAfter after: [Int]) -> [ArrayAction] {
        var arrayActions = [ArrayAction]()

        var map1 = [Int: Int]()
        var map2 = [Int: Int]()

        for (index, element) in before.enumerated() {
            map1[element] = index
        }

        for (index, element) in after.enumerated() {
            map2[element] = index
        }

        for key in map1.keys.sorted() {
            let index1 = map1[key]
            let index2 = map2[key]

            if index2 == nil {
                let deleteAction = ArrayAction.deleted(index1!)
                arrayActions.append(deleteAction)
            }
            else if index1 != index2 {
                let moveAction = ArrayAction.moved(index1!, index2!)
                arrayActions.append(moveAction)
                map2.removeValue(forKey: key)
            } else {
                map2.removeValue(forKey: key)
            }
        }

        for key in map2.keys {
            let addAction = ArrayAction.added(map2[key]!)
            arrayActions.append(addAction)
        }

        return arrayActions
    }
}
So as you can see there’s an enum called ArrayAction that represents the rows/items added, deleted and moved. Here’s how I use that method in my ViewController:
 private func performCollectionViewOperations(block: () -> (), completionBlock: (()->())? = nil) {
        collectionView.performBatchUpdates({
            let filteredBefore = self.dataSource.elements.map { $0.index }
            block()
            let filteredAfter = self.dataSource.elements.map { $0.index }

            for action in ArrayAction.operationsPerformed(arrayBefore: filteredBefore, arrayAfter: filteredAfter) {
                switch action {
                case .added(let i):
                    self.collectionView.insertItems(at: [IndexPath(item: i, section: 0)])
                case .deleted(let i):
                    self.collectionView.deleteItems(at: [IndexPath(item: i, section: 0)])
                case .moved(let i, let j):
                    self.collectionView.moveItem(at: IndexPath(item: i, section: 0), to: IndexPath(item: j, section: 0))
                }
            }
        }) { _ in
            completionBlock?()
        }
    }
And that private method is used like that:
    self.performCollectionViewOperations(block: {
        // do some adding, removing and moving of elements here.
    }) // not using the completionBlock here
And that’s pretty much it.
Where do I use this code and might it have anything to do with the title picture? Glad you asked. :P
It’s used in Poly Art, a game a friend and I made for iOS. It’s free to play and we’d be happy if you gave it a try!
(I really had a hard time calculating the deltas in the game, because I stubbornly avoided the generic solution. Instead I was trying to anticipate what changes were possible, but as any programmer sooner or later learns: Even the simplest things can get very difficult if you use just a few of them combined.)
I like to use the command line tool fortune which displays a random quote from a database of files.
I wanted to add quotes from Wikiquote. But it turns out that Wikiquote is difficult to parse and the API is no help. (The API gives you a structured document but the actual content is just one large wall of text that has to be parsed just like the HTML page.)
So after giving up on scraping the webpage I had the idea to use Wikiquote’s edit page.
Here’s how it works: Let’s say you want the quotes from the Richard Feynman page. Open it on your browser, tap edit, and you get the edit page for Richard Feynman.
Voilà. It’s much easier to parse! Simply take all lines from the <textarea> that start with one or two asterisks (depending if you want the source) and then filter out a few things like formatting and lines that only contain quotes. A much better scraping experience.
So yeah, that’s my idea/innovation. I wrote a scraper in ruby that you can find on Github which generates the files needed by fortune. Check out the README there.
I have S3 buckets that I use to serve public assets with (behind CloudFront, with a custom domain name). However the response always included the header field “Server” with a value “AmazonS3”. I didn’t like to publish the fact that I was using S3 (because what for?) and I wondered If I could change that string.
It’s not entirely straightforward, but not difficult either.
Here’s how I did it:
Set up S3 buckets
Set up CloudFront for these buckets
Set up a Lambda (Lambda@Edge only, this means us-east-1, N. Virginia)
Insert code (see below)
Actions/publish new version (must be versioned Lambda)
Select version and add CloudWatch triggers. NOTE: Make sure you use
the event type “origin-response”.
Ensure permissions for Lambda (logs:CreateLogStream,
logs:PutLogEvents, logs:CreateLogGroup, maybe others..)
Set up trust relationship for lambda role, see below.
Note that depending on you CloudFront setup it can take a while for your changes to become visible. I used the “Invaldations” feature to invalidate the cache for some urls.
 Lukas Z's Blog


